Panel Play Mats
Two weeks ago I hit 24 quilt shops in an hour and a half! How did I manage that? Because someone had the genius idea to have the small scattered quilt shops of East Texas set up booths for the weekend, in a centrally located fairgrounds building. The aisles were packed and sales were brisk, so I think it was worthwhile for the shop owners and I hope it is repeated!
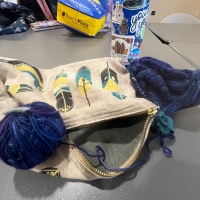
About every second booth had these play mat panels by designer Deborah Edwards for Northcott Fabrics. There are four panels with road ways and train tracks, for little ones to use with their little toys cars. They were very cute and I bought two sets, one for my grandson and one for the kids next door.
Since we live in the country, I felt the need for there to be a rural area to go with all the city life in the panels, and I thought I would just add some big green borders around the sides. On my drive home, I was planning, “Okay, I will need some batting, and what will I use for the backing?” Then I realized if I used batting, small toys placed on the mat would fall over; and if I sewed all four panels together into one mat, we might get some sharing problems: and then if I enlarged that with borders, it would get awkward to handle and throw in the washer…
So my clever idea was to keep the play mats child-size, by sewing only two panels together, and putting a “rural area” on the back of each one! This way they can be flipped and rotated in a variety of layouts. They can also be separated if there is a squabble or if only one needs to be washed.
I didn’t want to use batting, but I did want to give it a little more body, so I used some gridded interfacing I have. It’s non-fusible, so I stitched it to the panels along some of the roads and train tracks.

Four panels, two play mats. Deborah Edwards for Northcott.

Two play mats arranged a different way. If I had sewn all four together, there wouldn’t be as much variation possible.
I made the rural sides separately, from some bright green fabric (also Northcott) that I had purchased about 5 years ago. I wanted these to be pretty plain to contrast with the city prints, and have lots of room for toy animals. While I was digging around for the green fabric, I came across some large squares of jungle animal print that I had already bordered. The fabric wasn’t very good quality, so I had never turned it into a quilt. Fusing it onto the background fabric stabilized it beautifully, and it became a zoo out in the country.
If the panels are arranged with one city side and one country side visible, a driveway to a parking lot lines up with one of the roads, because you have to have a way to get to the country! I also made half of a pond on each mat. I fused the shapes down and then practiced satin stitch to cover the raw edges. I even made a little satin stitch speed bump!
I didn’t want to quilt everything together, because I didn’t want shadows of the city shapes like cars and buildings to appear on the country side. I could have done free motion quilting of grassy shapes, but I just put the two sides together pillow-case style.

The two country sides, with pond, parking lot, and zoo. Lots of open space for toy animals, etc.

Country and city together.

Zoo fabric.
I will admit that if the panels are lined up right, a toy car can drive off a city road and into the pond, but you’ve got to leave room for silliness. 🙂
I had so much fun working on this. I could have happily added parking space lines, gazebos, and hot air balloons, but I didn’t want to get too carried away. I went ahead and gave it to the kids last night — they liked it and hopefully it will give their mom a few minutes of peace during these hot summer days!


That is a very cute idea.
Thank you! I think the panels were very well designed to make lots of different options possible.
Like that you gave room for their imagination 🖒
Yes, I think it is important to do that. Thank you!
The city fabric reminds me of the Richard Scarry illustrations in kids’ books. Very cute. Maybe next time you could do detachable animals, vehicles, etc. the kids could move around. Oops, you probably don’t want to go that complicated.
I could have happily spent more time working on the details. That family is very respectful of handmade things and I didn’t want them to feel like it was too precious to play with. But if they like the mats, maybe some of those accessories will show up in their Christmas stockings! Thanks for the idea!
Absolutely terrific. What fun!
Yes, next time they come over, I may have to sit down with them! I have some Playmobil people and Britain’s plastic animals that would feel at home on those mats. 🙂
genius!
Thanks, I did feel pretty smart for making it in parts. 🙂
When my son was little we painted a city map with roads on an old crokinole board. I also made him a quilt with pop up caves and trees and various landscape types to play with a small set of fabric dinosaurs.
That pop-up cave quilt sounds so cool! Did you keep it? Pass it on to another kid?
I looked up crokinole board and that does sound like a great surface for a play map!
Hi. I still have the quilt. I’ll take some photos and put it in a post! Our neighbour’s little boy was over last week and played with it. The crokinole board was neat because we painted the sunken edge blue for a lake and the raised posts were fence posts for a park, etc.
That will be a great post! I look forward to it!
Brilliant idea and beautifully carried out. I love that you have left space for inventive little minds to create their own scenarios, with help from the mats. I suspect that you will have as much fun as the children do.. and why not!
That’s true! I guess that’s the fun of being grandparent-age — you get to enjoy the playtime and don’t have to worry about all the usual responsibilities!
I used the jungle fabric in my son’s “baby” quilt, made when he was already out of high school. He always loved cheetahs when he was a kid, so it was the right piece for him. 🙂
I really like that fabric because there is so much variety in it, and it was pretty much the same scale as the town side print. I had cut it up a little too wonky and didn’t have enough of it to make it into a baby quilt.
Have you told the story of that quilt on your blog? It sounds like an interesting one!
I had to look it up, but yes, I have told about it! https://catbirdquilts.wordpress.com/2015/06/20/sons-liberated-baby-quilt/
Those are fantastic! I want to drive a car into the pond!
On Aug 14, 2016 1:45 PM, “Deep in the Heart of Textiles” wrote:
> TextileRanger posted: “Two weeks ago I hit 24 quilt shops in an hour and a > half! How did I manage that? Because someone had the genius idea to have > the small scattered quilt shops of East Texas set up booths for the > weekend, in a centrally located fairgrounds building. The a” >
It does kind of bring out the Calvin-and-Hobbes-type plotting. 🙂
So cute! I’ll keep an eye out for them since my grandsons could use them, too 🙂
I really liked the variety of locations and vehicles they showed — it seemed like they would inspire more creative play. And there are lots of quilt shops interspersed among the other businesses! 🙂
Pingback: More Play Mats | Deep in the Heart of Textiles