Quick and Easy Gift Bags
I needed some gift bags, and I wanted to make them from a bunch of beautiful furnishing samples a decorator gave me. The pieces I had were about 12 inches by 13 inches, but most of the tutorials I saw online called for larger pieces of fabric. Also, the tutorials seemed to call for a lot more measuring, cutting, stitching, re-cutting, and re-stitching, than I was willing to do for just a gift wrap. So I figured out a way to combine these small samples into lined gift bags with a minimum of processing.
I think this lined bag is really easy to sew, even for beginners. (Plus, if you make any mistakes, it is just a gift bag, not an heirloom, so just mark it down to practice.) But if you are a cautious beginner, and you want to start with something simpler, you can try Bag 1 or Bag 2. For the lined bag, skip down to Bag 3.
If you trim your fabric pieces with a pinking rotary cutter or pinking shears, you can eliminate the turning and stitching of the raw edges, and still not have to worry about raw edges raveling. (If you don’t want to make a pinked edge, you can use a regular rotary cutter or scissors, but you will need to turn under your raw edges and stitch them in place, or use fusible tape, or glue them.)
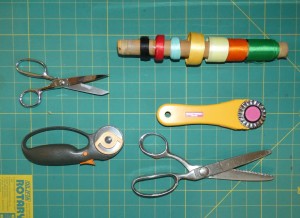
Supplies — ribbons, pinking rotary cutter and shears, and/or regular scissors and rotary cutter.
Okay, this is an extremely long post, especially considering that this is supposed to be an easy project! But there is a lot of repetition in the name of clarity — the same information presented in words, pictures, and diagrams. And I bet I still left out some information that someone would wish for. But here goes!
Bag 1, simple envelope with contrasting casing
Supplies:
- pinking rotary cutter and mat, or pinking shears
- straight edge to guide cutting and trimming
- 2 pieces of fabric, of equal size, with pinked edges all around. Both sides of the fabric will show for this bag, so either use something reversible, like a batik, or something that looks interesting from both sides. I used pieces that were basically square, but you can use any size you like. The decorator samples I used were very heavy weight polyester brocades.
- thread
- ribbon
- sewing machine — walking foot recommended for heavy fabrics
Step 1: On each of your two fabric squares, make the contrasting casing: Turn the top edge over about 1/2 inch [2 cm], back side showing on the front, and press.

Step 1: fold back side over to front of fabric, press.
Step 2: Turn each top edge again, about 1 1/2 inches [7 cm], and press. Stitch a straight line to enclose the raw edge of the top in the casing. Do not stitch along the sides.

Diagram 1: Fold the wrong side over to the right side a second time, and stitch across at the bottom.

Step 2: Fold again to make a big cuff, and stitch across.

Stitch across the bottom of the cuff to trap the raw edge and create your ribbon casing.
Step 3: So now you have two separate squares with cuffs along the tops. Place the two squares with right sides together, and starting under the cuff area, stitch around the remaining three sides, locking the stitches at beginning and end.

Diagram 2: Put the two squares together, right sides touching each other, and stitch the sides and bottom to each other.

Step 3: Place right sides together, and then stitch around the sides and bottom, starting under the cuff area.
Step 4: Clip the bottom corners to reduce bulk.

Step 4: Clip the bottom corners.
Step 5: Flip the bag so the right sides are on the outside. (Maybe your seams and casings aren’t lined up so perfectly — that’s okay, because once the ribbons are in place and gathered up tight, mistakes will not be obvious.)

Bag 1, turned right sides out.
Step 6: Cut two pieces of ribbon, about 3 times the length of the bag. (So if your bag is 12 inches at the top, you would cut two pieces of ribbon 36 inches long.) Starting at the right, thread a length of ribbon through each casing, front and back, going to the left. Take the other piece of ribbon, and starting from the left, thread it through each casing going to the right. Knot the ends of the ribbons and pull — you will have a nice drawstring.
The pictures illustrating this step are of Bag Two, below, and I will repeat them there.

Step 6: Ribbons threaded through casings from each direction, and knotted.

Ribbons pulled tight. Using two ribbons, each 3 times the length of the top of the bag, gives enough length for tying bows.
There are all kinds of choices here! — grosgrain ribbon, twisted yarns, bias tape, lace, wired craft ribbon — whatever you have on hand.
Bag Two — contrasting casing with pinked edges.
Using pinked edges on the fabrics means you don’t have to do as much turning and pressing. You are also stitching through fewer layers, which in my experience makes it easier to get straight seams.
Supplies:
- pinking rotary cutter and mat, or pinking shears
- straight edge to guide cutting and trimming
- 3 pieces of fabric, of equal size, with pinked edges all around. Only the right sides of the fabric will show for this bag, so regular cotton prints will work as well.
- thread
- ribbon
- sewing machine — walking foot recommended for heavy fabrics
Step 1: Using the pinking blade or shears, cut one piece of fabric in half to serve as the contrasting casing. You don’t have to measure exactly, just fold in half and cut. My rectangles ended up being 6 inches by 12 inches [15 by 30 cm].

Supplies: Start with 3 pieces of fabric, of equal size.

Step 1: Cut one piece of the fabric in half, pinking the edges.
Step 2: Fold the smaller rectangles in half the long way, and press. Enclose one raw edge of one of the big square pieces, inside of the tent-folded small rectangular piece. Pin and stitch. I like to stitch just a little above the pinked edge, leaving a very generous opening for the casing. Here are five photos to help you picture the process.

The tent-folded piece pinned to the front of a big square.

The tent-folded piece pinned over the back side of the big square of fabric.

The raw edge of the big square, trapped inside the smaller rectangle that will become the casing.

Stitched casing on the front side.

Stitched casing from the back side.
Step 3: Now that you have two squares, each with a skinny rectangle overlapping one raw edge, place those two large squares together, with their right sides touching. Starting right under the cuffs, stitch around the sides and bottom, taking care to lock the stitches at the beginning and end.
Diagram 2 (repeated here just so you don’t have to scroll up): Put the two squares together, right sides touching each other, and stitch the sides and bottom to each other.

Place the right sides together, and stitch around the 3 sides that do not have the casing piece.
Step 4: Trim corners to reduce bulk.
Step 5: Turn bag right sides in.

Bag 2, with pinked edge casing, before the drawstrings are added.
Step 6: Cut two pieces of ribbon, about 3 times the length of the bag. (So if your bag is 12 inches at the top, you would cut two pieces of ribbon 36 inches long.) Starting at the right, thread a length of ribbon through each casing, front and back, going to the left. Take the other piece of ribbon, and starting from the left, thread it through each casing going to the right. Knot the ends of the ribbons and pull — you will have a nice drawstring.

Step 6: Ribbons threaded through casings from each direction, and knotted.

Ribbons pulled tight. Using two ribbons, each 3 times the length of the top of the bag, gives enough length for tying bows.
Optional Steps:
For a little bit fancier bag, you can use a decorative stitch when stitching down the casing piece.
And you can box the corners to give a flat surface on the bottom. Boxing the corners is very easy, but it is a little tricky to figure out the first time.
Step 1: Start with the bag inside out (so the right sides are together inside the bag, and the seam allowances all around the sides are visible). Turn the bag at 90 degrees to a flat surface. Place the side seam on the surface, and let the bag start to collapse.

Turn the bag sideways, so the seam touches a flat surface.
Step 2: Keep letting the bag sag open. You want the unstitched sides to fold, as the two side seams line up on top of each other.

The side seam in your hand drops down toward the table, and the two unstitched sides of the bag widen and fold.
Step 3: The two stitched corners should now be right on top of each other, like a bishop’s mitre.

The stitched corners now line up on top of each other.

If you were to stand the bag on its open end, it would support itself with a sag in the middle. But you really don’t need to do that. This is just for people who like to see multiple angles of a project step.
Step 4: From one corner, mark down about 2 inches onto each diagonal, then mark a line connecting those two points. Making sure you are only working with one corner of the bag, stitch across that tip. Then do the same with the other corner. I turned both my seam allowances in the same direction as I stitched. (There is another view that might be helpful, at this Craftsy tutorial on making wine bags, their Step 3.)

Diagram 3: Stitching for boxed corners — fold the bag, measure 2 inches from the corner down each side, mark a line, and stitch.
Step 5: Turn the bag right side out, and you should have something that looks like this (maybe lined up a little better):

Bottom of the bag, after the corners are boxed.
OKAY! Now we are finally on to —
Bag Three– Lined Bag with Contrasting Casing!
This bag is almost as fast to sew as it is to read about.
Supplies:
- pinking rotary cutter and mat, or pinking shears
- straight edge to guide cutting and trimming
- 5 pieces of fabric, of equal size, with pinked edges all around. Only the right sides of the fabric will show for this bag, so regular cotton prints will work as well.
- thread
- ribbon
- sewing machine — walking foot recommended for heavy fabrics
Step 1: Decide on your fabric placement. (For this bag, I could have had a gold outside with a silver inside, or vice versa, but I chose to have the fancier fabrics, one gold and one silver, on the outside; and the simpler spiral designs on the inside. I chose the white spiral design for the casing.)
Cut your casing fabric square the long way, into two rectangles. You don’t have to measure exactly, just fold in half and cut. My rectangles ended up being 6 inches by 12 inches [15 by 30 cm].

Supplies for lined bag, 5 equal-size pieces.

One square is cut into rectangles for the ribbon casing.
Step 2: Lay the casing rectangle over one of the square pieces, right sides together, and sew along the long edge. Repeat for the other rectangle and another square.

Place a rectangle over a square, right sides together, and stitch the long side.

The rectangles are opened up after stitching the seam.

Here is what they look like from the front side.
Step 3: Now repeat with the other two large square pieces — place the casing rectangle on top, right sides together, and stitch the long sides for sort of a sandwich effect.

Two large squares with a rectangle in the middle, back sides showing the seams.

Squares with rectangles in the middles, from the front sides.
Step 4: Now flip one sandwich piece over the other, right sides together. Stitch around the three sides of each square (two sides and the bottom) but NOT into the casing pieces. Lock the stitches at beginning and end of the seam. See the diagram for the places to stitch.

I left the edge of the gold piece showing so you can see the placement, but in your real bag, you need to line up the flipped pieces evenly.

Diagram 4 — Stitch placement. Stitch around the sides of the squares, but not through the middle casing rectangles. (There is a thin line, showing where those rectangles were first stitched to the square pieces, before we got to this step.)
So at this point, your bag looks like this:

Silver side, with seams showing, still inside out.

Gold side, seams stitched, still inside out.
You could flip it, right sides out, and then it would look like this:

Silver side of the lined bag.

Gold side of the lined bag.
— and you could skip ahead to Step 6. But I am pretty sure you want to do the Optional but Highly Recommended —
Step 5: Box the corners of each of the two bags (which are now connected by the casing rectangles), following the directions above.

The lined bag, showing all four corners boxed.

Again, the boxed bottom, from a slightly different angle than before.
Step 6: Now flip the bag so the seams are inside and the proper pretty sides are outside. And then, push the lining side through the casing rectangles into the outer bag.

My lining bag is on top, right side out. I grab that top seam, and push the lining into the outer bag.

Push the lining into the outer bag.

Voila!

Inside.

Outside.
Step 7: Add the ribbon drawstrings as in Step 5 of Bag 2 above. Stuff with some presents and tie!

The finished Silver and Gold bag.

The finished bag showing just the gold side.

Fun fabric gift bags.
Of course there are endless variations you could do. I liked combining fabrics, but you certainly wouldn’t have to. You could fold long rectangles of fabric instead of using squares. I think these would be great made with orphan quilt blocks too.
You could change the measurements of the casing to make it more delicate, but I liked this width, because it reminded me of the proportions of Christmas stockings. And I could just thread the ribbons through with my fingers, I didn’t need to go find a knitting needle.
I also liked adding embellishments — I tied on a ribbon rosette and a sparkly ornament I had on hand. But mostly I liked turning these beautiful fabric samples into something useful!
So, with time being short before Christmas, I hope you find this tutorial useful. But for the future, you might also like this wonderful list of nine patterns for fabric containers — I want to make a lot of these as studio organizers! And, for true heirlooms, you should look at these thoughtful Give Wraps, made by Katherine at Something from Seaview, and her friend Polly. (Yes, she wrote about them over three years ago, and they have been on my mind all this time!)


Very nice……SO, where were you 2 weeks ago? LOL
Yes, if only I could get posts done in a timely manner! I was determined to get this one done sometime before Christmas 2018, didn’t want to wait until next year!
They are beautiful! Just like everything else you design. But Hallmark Gift Shop depends on me to buy a bag or two from them each year and I can’t let them down. How’s that for an excuse?
Maybe Santa will bring you one.
Your gift bags are adorable! I actually have a pair of pinking shears that i never knew what to do with, now i know
Hurray! I inherited a really good pair of pinking shears, and I was happy to find a use for them too.
Lovely fabrics, what a great additional gift to give with everything 🙂
If only I had gotten them done for Scrap Happy Day!😃
Well, if you have nothing else done by the time, and you’d like to show them, remind me and I’ll link to this specific post 🙂
What a lot of trouble you went to for us, putting this all together! Thank you–I’m going to see if I can do a bag with some of my leftover handwoven fabric!
You might want to stay stitch or serge the raw edges, but maybe you can make use of the selvages too, at leat for 2 sides of each piece. I look forward to seeing how it comes out !
Thanks for the instructions! I’ve made gift bags in the past but somehow couldn’t figure how to add a drawstring. This helps a lot.
Great, I am glad to be of help to you!
Lovely bags. I wonder if my husband could learn to make one for the wine I’m sure he’s gotten me. Hmm, as I reflect on my last effort to teach him how to operate a sewing machine, maybe not.
Maybe if y’all share the bottle of wine first….
I always speak other languages more easily after drinking so maybe that would help his sewing skills, or at least give you more patience for instruction!😃
Moi, impatient? Surely you jest.
I am sure you are a perfectly patient person, but teaching anyone to sew requires extraordinary skills, and wine just helps. Well, a little wine — too much might just cause an ER visit. 🙂
You certainly made good use of your fabric samples!
There are so many more! I will have gift bags to last for decades. 🙂
Your Gift bags are just lovely – and I am very honoured to have our GiveWraps mentioned in their company!
I really love your GiveWraps and they are one of the rare projects that stays in my mind. There are a lot of projects that I see and say, “Oh, I want to do that someday!” but then I forget about them when I see the next thing. But your wraps have stayed with me!
Lovely results there. Your posts remind me I have a large drawer full of fabric. I don’t have a machine, though, so it all has to wait til I’m in the mood for sewing by hand.
I’ve never quite understood how pinking stops fabric fraying… little zigzaggy edges do that?
I hope you’re having a happy Christmas and will have a happy and creative new year.
That is a good question about the pinking — I just do it and I never really thought about how it works! I think it just disrupts the path an unraveling thread could take — a weft thread that runs the full width of the piece can’t go anywhere, because there are little peaks of say, seven weft threads holding it in place. The little peaks can (and will eventually) unravel, but not all at once, and in the meantime they pin the full width weft thread in place.
Eventually I think the edge will fray, but since these bags won’t get rough wear, or go through the washer often, it will probably take a long time.
Your bags are so elegant with the beautiful fabric, a bonus gift itself. I also made simple fabric gift bags and pinked the seams for a finished look.
There is something so satisfying about fabric bags, knowing they will get some re-use, not like just throwing away paper, isn’t there?
Pingback: Wrapping up 2018 | Deep in the Heart of Textiles
Pingback: ScrapHappy January 2019 | Deep in the Heart of Textiles
Thanks for giving such kind of great ideas for crafting bags
You are a great artist having exceptional talent
Love your post and Keep posting 🙂
Pingback: Creative Juice #222 | ARHtistic License
Pingback: ScrapHappy June 2021 — Fabric Greeting Cards | Deep in the Heart of Textiles