ScrapHappy June 2021 — Fabric Greeting Cards
I like to send out cards for birthdays and holidays, but it takes me 30 minutes to drive to the store, and when I get there, I can never find the perfect card. So I decided to make my own, and how better to make them than from fabric?
It was easy to pick cute fabrics from among my scraps, but I had a hard time figuring out how to make mitered frames for the blocks. I am sure that “how-to” is on the internet somewhere, but I couldn’t find it, so here is the process I worked out.
Mini-quilt with 1-inch fabric frame
Supplies
- small piece of feature fabric (example, 6-inch square)
- batting scrap the same size
- backing fabric, in either a solid or non-directional print. Its dimensions need to be 4 inches larger than the feature fabric in both length and width (example, 10-inch square)
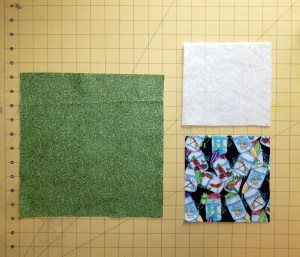
10″ square for backing, 6″ square for center, 6″ square of batting.
Step One
From the large backing piece, cut a 2-inch square notch from each corner.
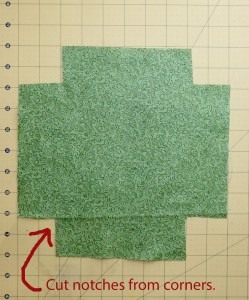
Step 1: Cut notches from corners.
Step Two
With printed side of fabric up, fold the flaps in to meet the edges of the central square, and press. They will have right sides together, and the unprinted side of the fabric will be facing you on all the flaps. (Do not fold them all the way in toward the middle.)
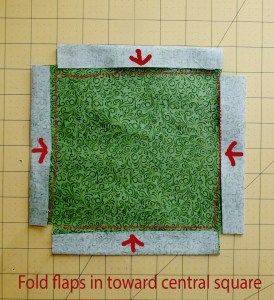
Step 2: Fold flaps in to meet the edges of the central square.
Step Three
Stitch a diagonal line across each set of flap corners.
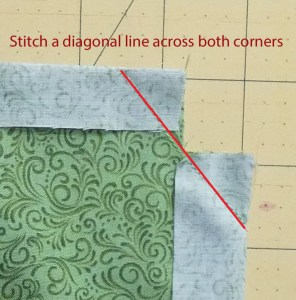
Step 3: With right sides of the flap fabrics together, stitch a diagonal line across the flap corners.
Step Four
Trim excess fabric from corners.
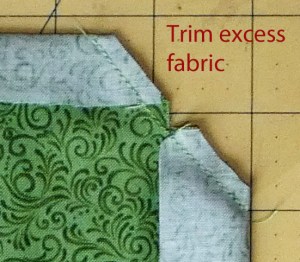
Step 4: Trim excess fabric from corners.

Step 4: After corners are trimmed, it looks like this.
Step Five
Flip the whole backing piece over. You will now be looking at the unprinted (wrong) side of the fabric. Turn each flap so the stitching lines are on the inside, and the printed (right) side of the fabric is up. You should have an octagon.
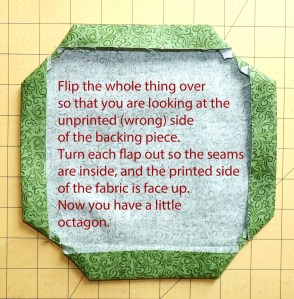
Step 5: Flip the whole piece over, turn flaps so seams are inside and right side of fabric is outside, making an octogon.
Step Six
Fold the flaps in toward the center, and press. I did not always get a good sharp miter, but I planned to cover the corners with embellishments, so that didn’t worry me. I wanted to miter just to reduce bulk.

Step 6: Fold the flaps into the center, and press.
Step Seven
Tuck the batting square and the square of feature fabric into the backing piece, and feature fabric. They should form a nice, colorful frame around your feature fabric. Press, and then topstitch around to hold everything together.

Step 7: Place batting square and feature fabric in the center, press, and topstitch all around.
Step Eight
You can add some quilting, and embellish with yo-yos, cute buttons, etc.
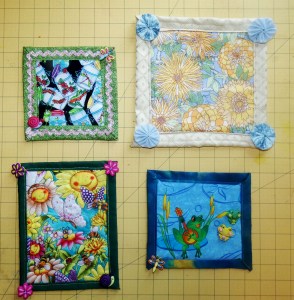
Step 8: Quilt and embellish as desired!
Options
You can make the frames thicker or thinner by playing with the sizes of the backing fabric pieces, and the sizes of the notches you cut out.
I got on a roll and made a lot of these. It was fun to pick scraps with certain people in mind. For some of the cards, I used more of the interior design samples that I got a few years ago.
They don’t fold like traditional cards, so I think I will just print out some sentiments on printer fabric, and then fuse those to the backs.
I have a group of them clipped up to my pegboard and I like seeing them there, and knowing that for once I am prepared for upcoming birthdays!
ScrapHappy Day is the 15th of each month, and it is hosted by Kate and Gun. I love love love scraps, so I am always happy to visit all the participants, and get some great ideas:
Kate , Gun, Eva, Sue, Lynn, Lynda,
Birthe,Turid,Susan,Cathy, Tracy,Jill,
Claire,Jan, Moira,Sandra, Chris, Alys,
Kerry, Claire, Jean, Jon,Hayley, Dawn,
Gwen (me!),Bekki,Sue L,Sunny,Kjerstin,
Vera,Nanette, Ann, Dawn 2,Noreen,
Bear,Carol,Preeti and Edith


What a clever idea! I am the worst when it comes to getting cards on their way in time, so I might have to try this so that I have some on hand. Thanks!
I am bad about sending cards on time too. Tailoring these for specific individuals might make me more motivated to send them on time. 🙂
I love that you’ve made personalized, quilted cards for friends. Thank you for explaining the process as well. I think we all cherish a home-made card in the mail. I know you’ll be making someone’s day time and again.
Thank you! I know you have made beautiful cards in the past and you made one this month too! You are one of the inspirations that had me wanting to make my own cards for over 5 years, so I am glad I finally got some done.
You’ve made my day, back when I first read this, and today when I’m finally back in my comments section. Thank you! xo
I do the same thing! I usually read blogs on a Kindle in the morning, and think of what I want to comment — then I forget to go to my desktop and actually type what I thought of. 🙂 Glad to make your day!
I’m so glad to know I’m not alone in this!
Sure beats going to the store!! Thanks.
Yes indeed! Although now I am on the hunt for super cute buttons to add as embellishments, so I don’t think I am saving any money by making my own. 🙂
Thank you for sharing this great idea! All the photos made it much easier to understand!
Oh good. I tried drawing diagrams in Excel but I just couldn’t get the shapes I wanted; it turned out to be easier to photograph actual fabric. 🙂
Super-cute and clever, and I now have a third way of creating mitred corners, so thank you for that!
Hurray! I did know a way to do mitered corners on fleece blankets, but I just couldn’t figure out how to do a twice-folded corner. It took me forever so I am glad it will be useful.
Always good to have more ways to make cards. I’ve used Misty Fuse to attach fabric scraps to card stock, and I’ve received cards with the fabric attached to a card stock backing with zigzag edge stitching.
I have thought about fusing scraps as well, and I think I will do that with tiny scraps to make traditional blocks. Someday!
Those are so clever, and a great way to use up the pretty scraps! I’m going to try out the method for doll quilts (with a narrow border).
Oh, that is another good application! I think I am also going to use it on some handwoven table runners I have — they are 8 harness twill with a less than perfect selvage, and have never looked framed and finished to me.
what wonderful, very personal cards. Thanks for the tutorial on mitered corners, going to give it a try, looks easier than my usual effort.
Oh good, I am so happy to hear that! I thought that there must be a way to do mitered corners that every sewist knew but me, and it took me all of a day to figure it out. So I am glad if it is helpful. 🙂
Briliant!
Looks like your method works well, and handmade cards are so much better than store-bought anyway!
What a clever and colorful idea! You are soooo creative!
CONGRATULATIONS! Your blog has been included in INTERESTING BLOGS in FRIDAY FOSSICKING at
https://thatmomentintime-crissouli.blogspot.com/2021/06/friday-fossicking-25th-jun-2021.html
Thank you, Chris
You never cease to amaze me with your great ideas and the wonderful results that follow.