The Basics of Fiber Processing
What are the three needs that humans have? Food, shelter, and clothing, of course. Humans have come up with ingenious techniques to turn short loose fibers into large functional textiles, but sometimes it’s hard to find information on the process. I find that most of those “The Way Things Work” type of books are heavy on the food and shelter (along with weaponry, communications, and transportation), and amazingly light on clothing information.
In this page I want to show how very simple techniques lie at the foundation of a huge variety of textiles. This is a simplified overview for students, teachers, writers, and illustrators – anyone who just needs to know how fibers become functional objects, without actually making some cloth themselves. (Although it is really fun….)
Two disclaimers: I am not an expert, just an interested amateur. And while there are plenty of environmental and social issues connected to textiles, here I am going to stick to just the process as I understand it.
There are five basic steps –
- gathering fiber
- preparing it
- spinning it into thread
- processing that thread into cloth
- finishing the cloth
Within each step are many possibilities, that have blossomed into gorgeous expressions of different cultures. But whether you are talking about Javanese batiks, Navajo rugs, Indian muslins, or Harris tweeds, they all have to start from the same steps.
Fibers
First you have to grow or gather some fiber. Many natural fibers have been used throughout human history, everything from yak to yucca. (Here is a resource on fiber plants.)
Over the centuries, likely sources were adapted and managed by people, so that they would have reliable fiber harvests every year. The “big four” fibers were cotton and linen (cellulose fibers from plants) and wool and silk (protein fibers from animals).

Fibers from various animals – not exactly wearable in this stage.

The plant fibers can look brittle and uninviting in their natural state.
Fiber Preparation
Silk is in a category all its own. A silkworm does all the spinning, and humans take the cocoons and unwind them, grouping filaments together. I don’t have much experience with silk, so let me direct you to a wonderful resource here.
But for the other fibers, there has to be some sort of preparation before they can be turned into thread. At the very least, foreign matter (things like seeds, plant stalks, or animal manure) has to be cleaned out. The fibers can be washed at this point, or later in the process.
Different tools are used to clean and straighten the fibers, and as you would expect they are basically variations on a comb or brush. Hand carders are like big flat paddle brushes, made with wire pins set in a cloth that is then stapled to a wooden back. Carders show up in medieval manuscripts, but like many textile tools, the exact year of their invention is unknown.

On the left is a dog comb, which can be used to comb long fibers. On the right is a pair of cotton cards.

card close-up
These tools help you prepare a fluffy mass of aligned fibers, so that your resulting thread will be smooth and consistent.
Thread
The next step is to spin these loose fibers into a useable thread. (Thread, yarn, string – different terms have different connotations of size and softness, but the process is basically the same for all.)
Turning a roll of fluffy fiber into thread is in one way like rolling a ball of clay out into a long, skinny snake. In both cases you are trying to extend a compact mass into a long smooth filament. But the individual fibers are short, so to get that filament, you have to draw out a few, twist them under tension, and continuously overlap new fibers into the thread.
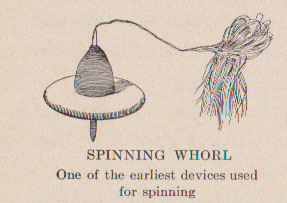
The way to do this quickly is to use a spindle. In its most basic form, a spindle is a stick, stuck through a round weight. (Think a pencil stuck through a half of a potato.) First you spin a small amount of thread with just your fingers*, and you wrap that around the spindle as a leader. The rotation of the stick twists the attached fiber, like an upside-down version of twirling a fork in spaghetti. The weight (called a whorl) stabilizes the stick, and provides a faster, longer period of rotation than you could manage without it.

Drop spindle with leader (starting thread) attached. The round disk is called the whorl.
One hand holds a bunch of loose fiber, and the other flicks the spindle to give it a twist. The fibers closest to the tip of the spindle start twisting, and the twist travels up into the loose fiber. The skill lies in timing the flick, stretching out and pinching just the right amount of loose fiber to form the next little piece of thread consistently. (Pulling and pinching the loose fiber is called drafting, and there are many methods to do this.)

The twist in the leader thread travels up into the loose fiber – you can see the red and white twisting together.

Different drop spindle, same process – draft the fiber, twist the spindle, let the twist travel up and form thread.
After you spin a few yards of thread, you have to stop, grab the drop spindle, and wind your new thread on to store it.
And even after you have spun yards and yards of thread, you are not ready to turn it into cloth. One single ply of thread can untwist, or kink back on itself if it is not held under tension. It may also have weak spots. The way to get around this is to spin at least two separate threads, and then twist those two together, in the opposite direction that the first thread were spun. This is called plying. So when you are figuring out how many yards of thread you will need to make your finished item (but don’t worry, I will skip all the math for now), you have to spin at least twice that much.
For thousands of years, this is how all threads were spun – for every sail on every ship, every bed curtain, every tunic. Spindle whorls have lasted where spindles and looms have rotted away, turning up often in archeological sites, but this method of spinning is so portable that it is still practiced to this day in some cultures.
Drop spindle illustration from Textiles, from 1915.
Eventually someone realized that you could set the whole thing sideways into a support, add a drive band to the whorl, power it with a big wheel, and presto! you had a spinning wheel! You could spin faster! You still had to stop, and reverse the wheel to wind on what you had just spun, but it was much faster. No one knows for sure where and when the spinning wheel was invented, but it seems it came from India originally, and was in Europe by the early 1300s.
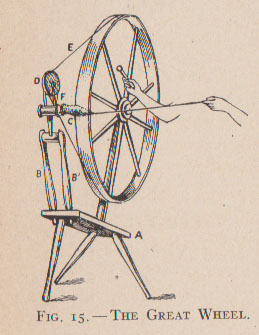
The spindle is set horizontally – turning the great wheel causes the spindle to turn quickly. Illustration from 1915 book Textiles.
Two more innovations came along about 1530. One was a treadle that allowed the wheel to be turned with foot power, so both hands were available to draft the fiber. The other was a U-shaped piece of wood, called a flyer, set around the bobbin on the spindle. It turned at a faster speed than the spindle, and that would cause the newly spun yarn to wind itself up onto the bobbin at the same time it was spun, saving lots of time.

Flyer diagram from 1915 book Textiles. Hooks on the flyer guide the spun thread onto the bobbin.
This wheel with a treadle and flyer is called a Saxony wheel or flax wheel, and it is probably what pops into your head when you hear the term “spinning wheel.”

Saxony wheel or flax wheel, from 1915 book Textiles.
In the 1700s, inventors built on these innovations, setting multiple spindles on frames and powering them with horses or water power.
Turning Thread into Cloth
Loose string doesn’t make for practical clothing, so once you have all the thread spun, you have to find a way to hold it all together. Essentially, you can either loop one thread continuously, as in knitting or crochet, or you can cross two sets of thread, as in weaving. I know more about weaving, so that is the direction I will follow!

Diagram of threads in weaving and knitting.
To weave, you can’t just lay a bunch of loose threads on the ground and try to criss-cross them – they will get all tangled up. A loom is a device that will help keep the threads in order while you weave.
Here is a sample I made just to illustrate the concept. I used a picture frame, and wound a ball of yarn over two opposite sides to create a set of parallel threads. This is called the warp. (For more complicated looms, you measure out your warp threads by winding them around a set of pegs. Again, lots of math, that I will skip. You’re welcome.)

Warp threads on a simple frame loom.
The next task is to weave one thread, the weft, in and out of these warps, to create one row.
The most basic way to weave is to pick up alternate warps with your fingers, and work the weft thread under those warps. It will sit on top of the threads you did not pick up, and that’s where it will show. You may have done this with paper in elementary school, and you may remember the “over one, under one” sequence.
The space between the “over” warps and the “under” warps is called a shed, and the device that holds the weft yarn as it goes back and forth is called a shuttle. Here I am putting a red weft through the shed, so that the contrast shows up. You can see that I have already woven four rows.

Picking up alternate warp threads with fingers, and putting the weft thread through on a shuttle.
Of course it is human nature to try to find a shortcut! One thing you can do, is mark one shed with a shed stick. You leave it in the warps, and every other row, you prop it up so that your shuttle can quickly go through.

The shed stick in place.

The shed stick is propped open.

The shuttle can easily go through the shed.
Using the shed stick only helps you half the time though. And you can’t use two shed sticks, because one blocks the action of the other.
At some point thousands of years ago, people figured out that you can automatically lift those warp threads that the shed stick is not controlling, if you catch each of those threads in its own little loop of string. These loops of string are called heddles. They can be attached to a heddle rod, and lifted all together, and then when you want to use the shed stick again, the heddle strings can be pushed down out of the way. So the sequence is “Open the shed stick, put the weft through, pull up the heddle rod, put the weft through.” Not easy, but much better than trying to pick the threads with your fingers every time.

Loops of string (red for contrast) pull up individual warps, but sink down out of the way of the shed stick.

Here all the heddles are lifted to make the alternate shed.

You can see how the heddles life the opposite threads from those the shed stick lifts.

When the shed stick is used, the heddles drop down out of the way and the shuttle can go over them.
Fairly early on, some people figured out that you don’t have to stick to the “over one, under one” sequence. You could go “over two, under one,” or, “over one, under three.” If you make sure to move over one thread in each row, you get a diagonal pattern and a more supple fabric. You could use your fingers to pick up these pattern threads.
But, if you already know how to use one heddle rod, it’s not that big of a jump to use four! All kinds of pattern opportunities arise!

“Over one, under one” – plain weave.

“Over three, under one” – a twill variation.

The reverse of the fabric above – here the red weft has gone “under three, over one.”
Basically, all a loom has to do is keep the warp threads in order. It might have some bonus features, like beams where you can roll up extra warp thread so you can weave longer pieces, and the cloth that you have woven.
In antiquity many looms were vertical.

Vertical warp-weighted loom. This type was used in ancient Greece, Scandinavia, and Europe. Do you see the heddle rod?
This is the best video I know to show the details of how a warp-weighted loom works. It even shows the details of setting up the warp, making the heddles, and rolling the woven cloth onto the cloth beam:
Other looms are horizontal. They can be just threads stretched along the ground –

A simple backstrap loom is tensioned by the weaver’s body, making it hard to leave in the middle of the project.
– or a stout frame that holds the warp threads up off the ground.
With a horizontal loom, instead of using a heddle rod, you can keep the heddles on rigid frames (called shafts or harnesses), using pulleys or jacks to lift them. Gravity helps them quickly fall back out of the way when you lift the next shaft. Selecting groups of pattern threads is quick and easy.

Heddles can be made of string or wire – one warp thread goes through each loop in the middle. Many looms have 4 – 16 of these frames (shafts) that are lifted or lowered to create patterns.
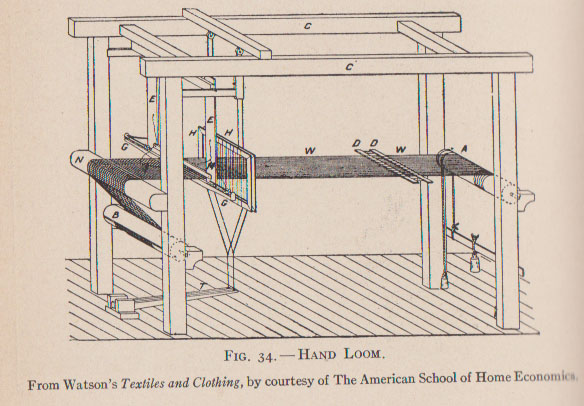
This diagram shows how the warps are stored around a beam (here on the far right), brought through the heddle shafts, and up to the front (on the left in the diagram). The huge frame holds the warps taut, and provides a way to lift the heddles. The weaver would be sitting on the left, with their feet working the treadles at floor level, and their hands throwing the shuttle from side to side in the space between the shafts and the breast beam. Woven cloth would then be wound around the cloth beam at their knee leve.

On this loom you can see the warp stored around the warp beam and brought to the front in preparation for weaving.
Finishing
Once you have woven to the last inch of warp, your project is not finished. At this stage it is called a web. For proper finishing, it should be treated with water and friction, to help the individual threads bloom, and all the threads settle together. Then it is cloth!
Dyeing
Dyeing can be done at any of these stages.
So there you have a brief overview of what it takes to make cloth. I hope it is helpful. If you need anything cleared up or explained further, don’t hesitate to ask!
*You can try spinning with just your fingers, with a cotton ball. Pinch the top and bottom edges of the cotton ball, and pull gently in opposite directions. The cotton ball will stretch out, getting longer, but thinner in the middle. Roll the thumb of your dominant hand up over your forefinger, catching a small amount of cotton between thumb and forefinger. (It is the same motion as any long-haired girl uses to twist her hair when she is bored.) As you twist the cotton around your finger, stretch it away from the center of the cotton ball. Hang on to the mass of cotton with your other thumb and finger. Roll and pull, roll and pull, and eventually you will have a little thread. This is very basic spinning.


Pingback: A Little Commemoration Here, Please | Deep in the Heart of Textiles
This is great. In the picture of the vertical loom, I’m guessing those grey weight-stones at the bottom of the… warp, isn’t it? what are called loom weights? These show up *everywhere* in the ancient material record, and I’ve never really figured out exactly what they do. Literally weight the thread, I gather? It’s incredible how much work goes into making cloth. No wonder so many societies got to cloth and were like, yeah, I think this is good, let’s stop here and not bother with cutting and sewing, we can drape and wrap and work with this – thus saris, togas, chitons, and I’m sure many others!
Yes, those loom weights keep the warp threads under tension. Remember when you went to that conference and took pictures of the textile books? Well, I bought one of the series, and it had so much info on the loom weights, how they were standardized and labeled, etc. And back in the 70s, archaeologists just tossed them all away because “there were too many to count,” and so on. And now, they can use them to estimate how many weavers were in one workshop, and what they were making, which in turn tells them a lot about the economy of a society – so interesting!
And when the weaving was done on vertical looms, weaving was women’s work, but once it went to horizontal looms, it became men’s work.
This is the most understandable explanation of how a loom works that I’ve ever seen. I’m feeling quite motivated 🙂
Oh good! I was thinking the other day that I need to change the title of that page to something more clear — it sounds like I am doing some extremely basic project, instead of trying to explain in basic terms, how the whole process goes! I am glad to motivate you about weaving — if you have any problems or questions, let me know and I will try to answer them!
I was wondering if looms are made specifically for the fabric, or if in general all looms can work with any type of fabric. Great job explaining all this.
Thank you! As I understand it, in general the type of loom that was developed depended on the type of environment. People in dry places could have horizontal ground looms, set up outside, and easy to pack up when they moved around. People in colder, wetter places, or people that stayed stationary, tended to use vertical looms that they could prop up against a wall inside the house. The best reference is The Book of Looms by Eric L. Broudy. Horizontal ground looms were used earliest in Egypt to weave linen, and later the Egyptians also used a vertical two-bar loom. In Greece, early Europe, and Scandinavia, the vertical warp-weighted loom was used, and I believe it is especially good for wool, but can also weave linen. Broudy says that the horizontal treadle loom was adopted in different cultures when they wanted to weave the finer fibers of cotton and silk.
Nowadays people might use a vertical loom for tapestry, but for any other purpose, handweavers would use a horizontal loom, with any kind of fiber. Please let me know if you have any other questions! 🙂
do you think it’s possible to use long fiber sphagnum moss to make a textile?
When I worked at a historic park, I learned that Spanish moss was used to fill mattresses — it had to be dampened and then dried first, so the outer fiber would fall away, like with flax to make linen. So I would think you would have to do that step first, and then you could try spinning it.
I also took a quick look through Peter Collingwood’s book The Maker’s Hand, which covers all kinds of practical items from all over the world, highlighting different textile structures and materials. Unfortunately there is no index! But there are items made from grass, agave fiber, etc., so you might find something to help you in that book. There are no details about fiber prep or spinning, but there are diagrams on how to do the different techniques in making the textiles.
Pingback: Working with Your Mill: How to Get the Most Accurate Fabric Representation. – Shanghai Garment
Pingback: What Is the Process of Cloth Manufacturing? - Shanghai Garment
Pingback: What Are the Stages in Textiles From Scratch to End Product? - Shanghai Garment