Quite Possibly, the World’s Bulkiest Quilt
I started this string quilt three years ago! At the time, I asked for setting options, and most people liked the idea of narrow sashing around the string blocks.

I thought that would be a good look too, but then I realized that because the blocks were string-pieced onto a foundation of muslin, they were already one layer thicker than a usual block. I worried about the discrepancy between one-layer thick sashing, and two-layer thick blocks.
So the blocks sat there. And over the years in my memory, the stack of blocks grew until I had at least 100. And the day came when they were the next project to work on, to just get them together somehow, so that they would stop sitting on their tray, looking at me.
I started sewing squares into rows, but I only had about 40, not 100.
Well, I thought, I’ll just group all the squares in the middle, and use wide borders all the way around.
At one time I had also had a plan for which backing fabric to use, but I didn’t write it down. And when I pulled out my assortment of backing fabrics, this one jumped out at me.

Backing fabric.
I bought this years ago for $2 a yard. In the shop, it looked gray, but when I got it home, it was definitely brownish. The very neutral tones seemed to be a good match for the browns and pinks in the shirting fabric strings. It is almost like a polished cotton, a little heavier than my usual quilt backs, but it really seemed to go well with the shirting patterns, and I didn’t think it would ever go with any other quilt top. So into this project it went.
I planned to use a queen-size wool batting. I have used Hobbs Tuscan washable wool in the past, but for some reason, this time I had ordered Quilters Dream wool. When I opened it up, I realized it was twice as thick and lofty as Hobbs. And the more it relaxed in our humidity, the more it expanded.
It is literally a half inch thick, and I can count five layers. Hobbs has two distinct layers that are easy to separate if you want an even thinner layer of wool. The Quilters Dream wool layers seem more interwoven, and I was afraid that if I tried to separate them, I would get a big shredded mess. (Although, trying to separate layers in a scrap just now, it went fine.)
So, are you starting to see where this is going? Extra fabric in the top, extra heavy fabric for the back, extra fluffy wool in the middle?
I basted the batting to the backing with spray and pins. It was the moment of decision. I did not have to commit the string blocks to this lofty batting, I could just use some flannel and another backing for them, and come up with a new top for the ever-expanding wool.
Nah.
If I did that, the uncovered wool batting would sit there for years, gathering thread scraps and dog hair all over itself.
I don’t usually complete tops before constructing the quilt. I place the center two rows (or columns) on top of the entire batting and backing, and stitch one seam down in the middle of the quilt. This is the row that takes the most concentration, but then I can just flip each row open, stitch another to it, etc., and it all ends up looking like the best stitch-in-the-ditch ever.
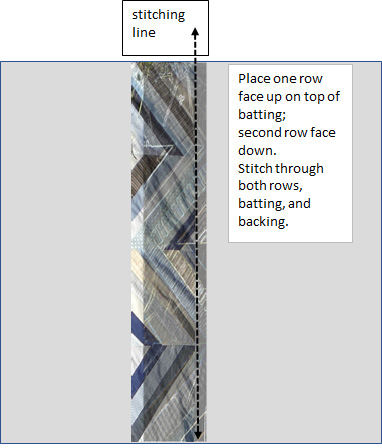
Step 1: Place both rows in the middle, one facing up, one facing down, and stitch through all layers.
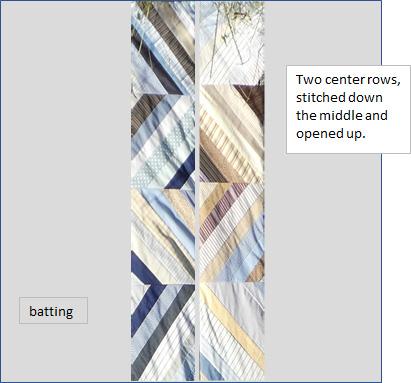
Open out the two rows.

Step 2: Place the third row face down onto row two, and stitch through all layers.
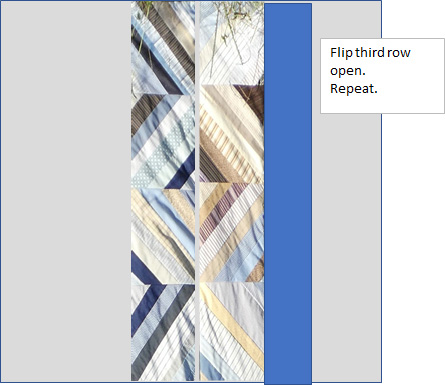
Flip open row three, and continue.
For this quilt, I thought that I would also do the quilting of each row as I went, before doing the stitch-and-flip of the next row, to keep the puffiness under control better.
I sewed the two center rows down, and tried one row of quilting. But the diagonal lines in the blocks meant I had to keep swinging the quilt from side to side. I could barely move it.
I decided to just stitch and flip the rows, and then hand quilt later. I had set one of the rows down on top of some gray chambray, and I liked how that framed the shirting materials, so I added 6-inch strips between two string rows.
And then I immediately thought how much better it would have looked if I had added very thin strings to the gray chambray bars.

I added some thin strings to the gray bars with Photoshop. If I ever do another quilt like this, I will add them in real life.
But I was not going to unstitch, or fuse on top and then stitch the edges, so I did not even attempt it.
So this is where we are now.

Shirt stripes string quilt.

The backing folded over.
It is machine-stitched at 6- or 11-inch intervals, and it is bound. It definitely needs more quilting, but at least it is all together, and nothing can fray. I am planning to do diagonal rows across both the string blocks and the gray bars.
And then, we will have to move to Alaska in order to use it.


I recall a t-shirt quilt I made years ago (the only one, and it was a commission). By the time it was done, it weighed a ton! Things have improved in that type of quilting since then. Haha. I haven’t attempted another. At least your quilt is a good excuse to take a trip to Alaska, but you might need an extra suitcase, just for the quilt!?!
I have made one t-shirt quilt too!
You’re right about the extra suitcase — I had not thought about that extra baggage fee! This could be a great picnic quilt, but I would have to go wash it in a commercial washer between picnics.
What a great idea to basically foundation piece your columns to the batting and backing! I think I would have bagged up that wool batt for future use but ya gotta do what ya gotta do. 😉 Diagonal quilting in those wide gray stripes will definitely make this quilt sing.
I had ordered two battings!! So I still have another one. I will either cut it up and use it for smaller projects, or possibly donate it to a local guild for their sale. Or maybe one day I will get brave and try to pull apart the layers. 🙂
Well, weighted blankets are all the rage now! I see them advertised everywhere, and I always thought that several quilts would do the same thing. Sounds as if this quilt by itself could serve as a weighted blanket. It’s lovely, by the way!
Thank you, I do love those shirting fabrics. I had the idea I would completely use up old shirts, but I still have so many scraps left!
I’m trembling with fear at the idea of hand-quilting through all that *and* all the seams in your string blocks! I’d have used your lofty batting, but done QAYG on each block, I think, leaving me with only the gray bars to be quilted later. It would be lovely for someone who needs weighted bedding to calm anxiety and sleep well.
I love doing QAYG, except for all the cutting up of everything ahead of time. I wish batting manufacturers sold pre-cut blocks. I am just not precise enough. Even with this quilt, which had minimum matching, I somehow managed to get a parallelogram instead of a rectangle.
I am planning on minimal hand-quilting too, because those strings really can’t go anywhere. I hope it will be okay. Slow, but okay.
If they sold pre-cut 14 inch batting squares, I’d probably keep them in business single-handed! I’m a bit inaccurate too, which is why I tend to cut my backing and batting squares 2 inches larger than I need, quilt, and then trim out to match the front.
I would buy stacks of pre-cut squares too.
I have this image of you, sitting at the sewing machine and wrestling with this monster! I do like the look of it and it should hold up to lots of use!
I really had to steel myself to work on it a little each day. You’d think my biceps would have more definition now. 🙂
Thank you for your explanations. i feel like I understand how you made it. 🙂
Good, I’m glad. Sometimes it’s too easy to use a craft-specific term without explaining it to those who don’t know it yet.
Been there, done that. We don’t use the quilt, but I can always hope for a friend in an unheated cabin in Maine to need it 😆
Oooh! My brother sends me things from Zillow — he found a house in Maine from the 1800s, on 50 acres with its own pond, for like $65,000, and it is between a bunch of parks. I would love to “summer” up there instead of in the Texas heat.
We lived in far Northern Maine for a decade and summer is a lovely time there
Congratulations! Your blog has been included in INTERESTING BLOGS in FRIDAY FOSSICKING at
https://thatmomentintime-crissouli.blogspot.com/2019/06/friday-fossicking-21st-june-2019.html
Thank you, Chris
Pingback: A Finished Quilt and a Bucket List | Deep in the Heart of Textiles