ScrapHappy February 2023
I am thrilled to have a finish for this ScrapHappy Day! I started this quilt last year.

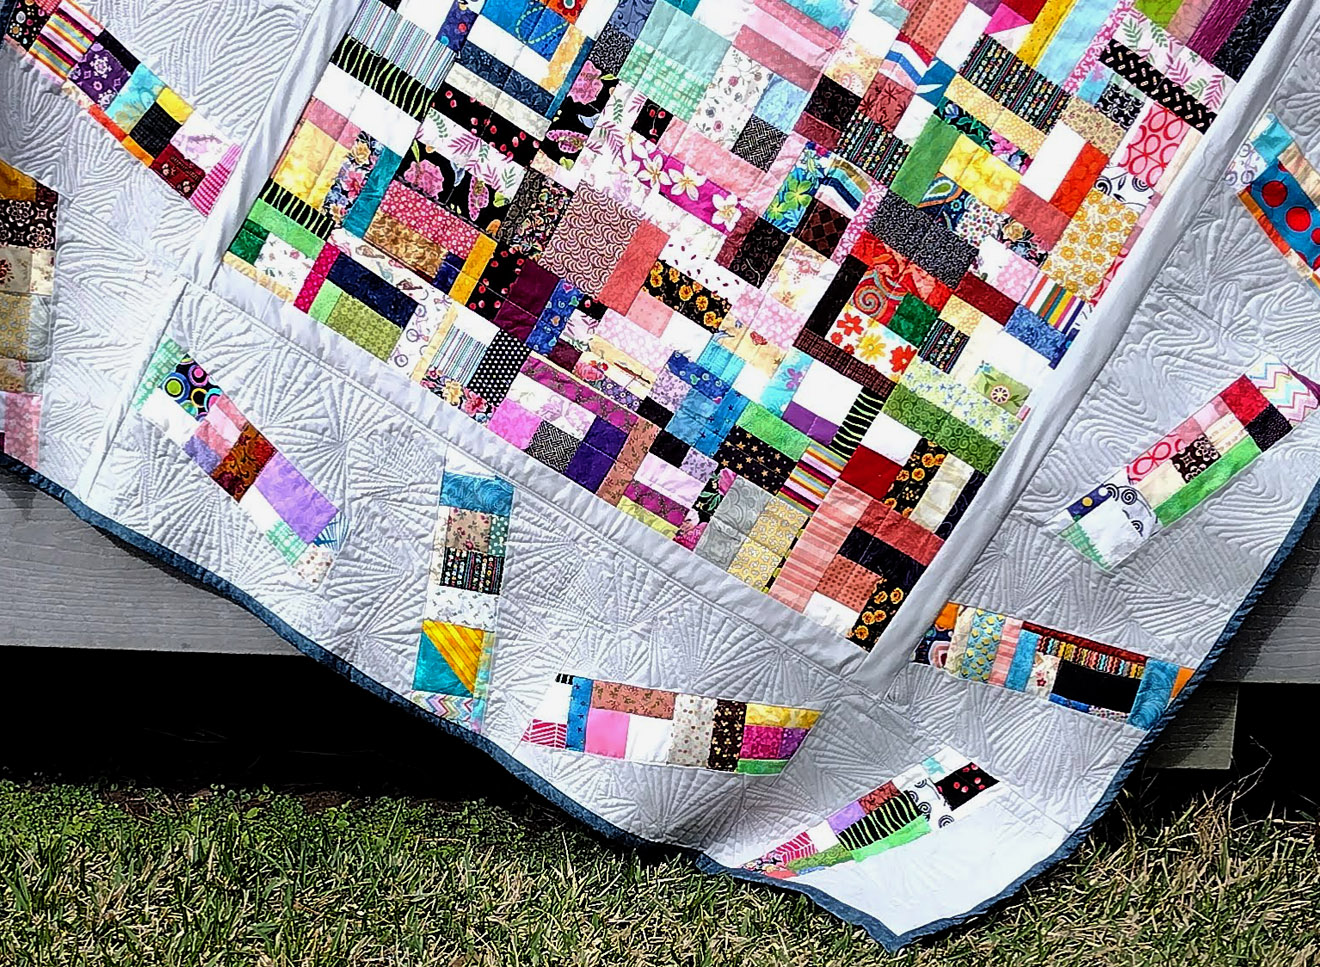
The Scraps Escape, based on a design from Kelly Young’s book, Stash Statement.
I did this quilt Quilt-As-You-Go, with a central rectangle, and four skinny panels. I quilted the center with straight lines to outline the patches, and I did the first skinny panel with a sort of wood-grain look. But then I got distracted and left it in a basket for months.
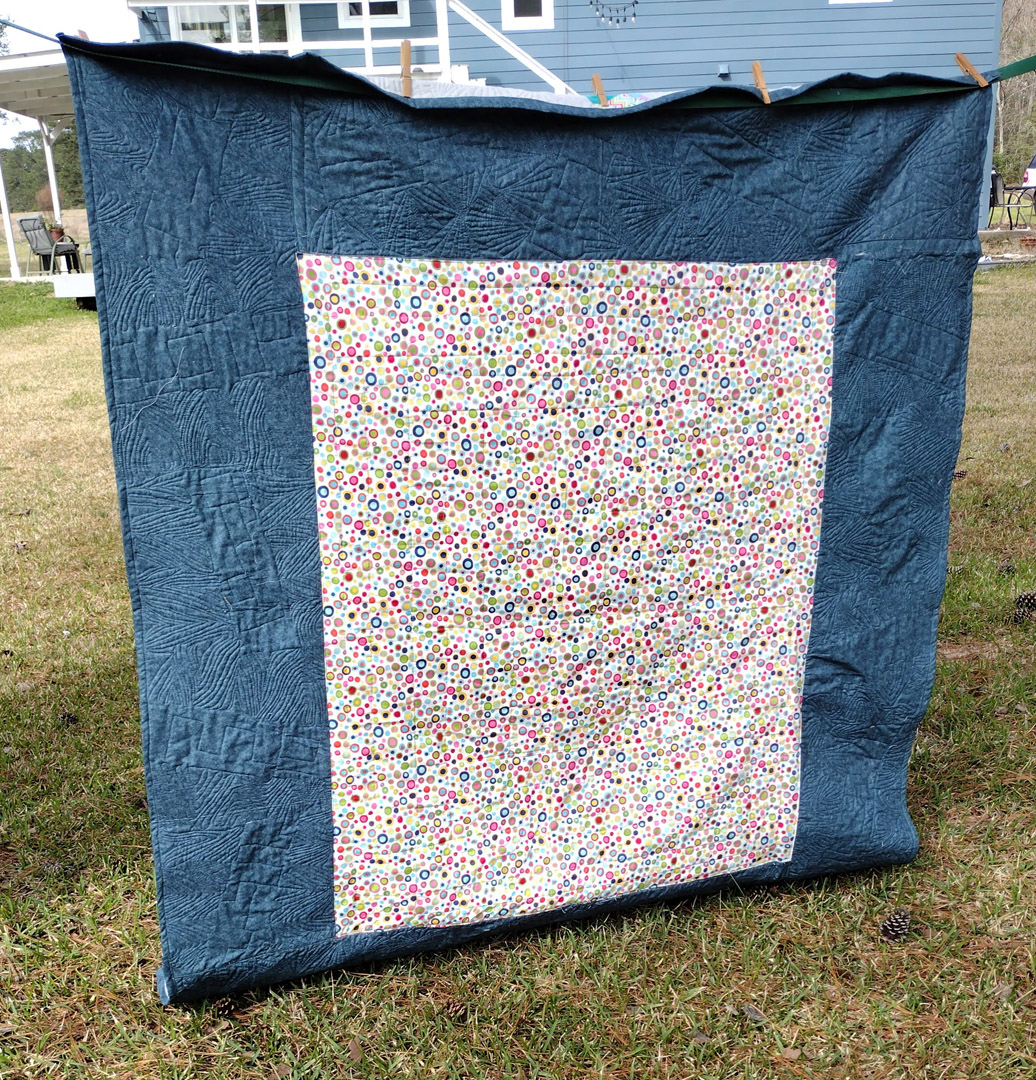
The back, showing the skinny blue panels around the center rectangle.
By the time I got back to it, I wasn’t that enamored of the wood grain, because it was really hard to make transitions from area to area. I tried different designs, and ended up with a sort of angular petal design that worked for me.
After stitching the four skinny panels, I realized I was going to want a thin border of gray around the scrappy center, so that the parallelograms didn’t touch the center; I wanted them to look like they were flying away. Adding a little gray border was simple, but I should have quilted it too; in the finished quilt it just looks poufy.
The different quilting designs are evident. I like the one on the bottom panel the best.
And putting the whole thing together was no picnic. There are different ways you can join the quilted sections into one big quilt. I am not going to go into details on my process because it was not a good one! But it involved LOTS of turning excess fabric out of the way temporarily, trimming, pressing, top stitching, and trying to figure out what to do where corners met up. I had a hard time getting the batting sections to match up perfectly, and I can definitely feel where small areas of batting are either joined up double-thickness or missing entirely.
Right now I have a few other works-in-progress, where the tops are still in sections. If I had really liked this QAYG technique, I would have opted to complete those the same way, but it turns out that for me, the traditional way is easier.
But this quilt was intended just for me, so I had the freedom to experiment with all kinds of threads, stitch patterns, and QAYG techniques, and I am glad I worked on it. I really love the way it looks.
ScrapHappy Day is the 15th of each month, when various artists and craftspeople celebrate scraps. It is hosted by Kate and Gun, the first two names listed below. Even when I don’t have a scrappy project to post myself, I love to click around and see what the other Scrapsters have been up to each month!


This is just fabulous! Such a lot of work, and such an amazing end result. Bravo!
Thanks, Kate, I bet you could give me lots of tips on QAYG, but I was not patient enough to look up your posts or ask you, I just charged ahead while I was feeling it! 🙂
Often the best way. Momentum is a great way to get things finished! I don’t think my way is greatly different from anyone else, but in case you want to take a look, the post I wrote about it is here:(https://wp.me/p3Wfbs-2os)
Thanks, I went and looked! I think where I went wrong was in having the four long panels to surround the central rectangle. I was trying to reduce the number of cuts in the batting. I see that now precut squares of 14″ are available, but for about triple what an uncut batting goes for. I just need to either stick to smaller quilts, or rent time on a longarm. 🙂
I buy batting on a roll, and when I’m starting a quilt, I unroll it and use a marker and long ruler to mark off strips the right width which I then chop down into squares the right size so I have a pile ready and waiting. You can do QAYG quite easily with larger sections too, but you need to remember that the seam allowance is *included* in the dimensions, not taken off. Once you have the ‘rules’ in your head, it’s foolproof. I find the easiest way is to sit down and draw stuff to work out how to break a quilt down into manageable sections.
I love the title, and that’s just what it looks like. Some of mine are free to go, if they’d like. I’d hardly miss them! The whole quilt looks amazing. I have a friend who does all quilts QAYG, because she doesn’t have the space for anything else, and I don’t know how she solved those problems, which must have shown up for her, too.
Marti Michell has some good techniques for quilting in sections. I took her on-line course at Craftsy.com to learn.
Thanks!
I love your comment that some of your scraps are free to go! Mine just keep multiplying before I can put them to good use. 🙂
I thought QAYG would work in my small space, but I still had to spread out all the sections to line them up, and now they were bulkier than usual. It was a good experiment but I am glad it’s over. 🙂
Scrappy experimentation is good! I love the result too, with all those scrappy parallelograms flying away, so energetically!
Thank you, Kjerstin!
I agree that experimentation and improvisation is a good approach when working with scraps.
Yes, I love working with scraps for just that reason — they are not precious so I can try all kinds of things. 🙂
I hope this made a little dent in your scraps. I have negated the need for such a technique by making only smaller pieces and quilting by checkbook for anything lap quilt size and above. And you’re right about the thin gray border.
I recently had opportunity to buy a longarm machine at an estate sale for a bargain price — but I would have had to put up a new building to house it! And then I would have wanted to add a bathroom to that building, etc. etc. So any time I pay a longarm quilter, I am still saving loads of money over that scenario, right? 🙂
To say nothing of saving yourself that learning curve. I know some quilters who got a long arm but never got skilled enough for show level work.
love those scrappy pieces flying away, wish some of my scraps would do the same. the finished quilt is very pretty and colourful.
Thanks, Jean! A lot of them flew over to my house from someone else’s — they were not anything I would ever have chosen, but I was happy to combine them and use them up. 🙂
And if we didn’t have those quilts we just decided to try things on, how else would we learn? I think your quilt should bring you a sense of achievement. You finished it, and you learned quite a bit in that process. Well done!
Congratulations on a beautiful finish!
Wow! Gwen you nailed scraphappy! I love it!
Love the border! Really a new way, for me, to use up the scraps!
Thanks, Gun! I would have never come up with it myself; even though I do improv blocks, I tend to think in straight lines. 🙂 I really like that Stash Statement book where I got the idea.
Lovely quilt and very interesting border blocks! Nice!
Put me in mind of this: Ladybug! Ladybug!
Fly away home.
Your house is on fire.
And your children all gone.
All except one,
And that’s little Ann,
For she crept under
The frying pan.
I never heard that second verse!
We have these invasive Japanese ladybugs that get in the house and swarm all winter, and they bite, too! I wish they would fly out of here. 🙂
Good Morning, well I had to look up your variety of Lady Bugs and they are indeed the bad cousins of our cute little red ones. be a while before we see any, starting to snow again and by Thursday it will be 5 F at night. whoo Hooo I love it because I can still go in the woods and walk ON the snow. And I am originally from Northern NH and the cold is in my genes. Woof
I do not envy you so much cold weather, but I am glad you are where you can enjoy it! 🙂
I love this quilt and the quilting on it is amazing!
Thanks! I got one of those Quilt Halos (little rubberized metal hoops) in a thrift store bag, and it really helped me move the quilt easily.
Here is the link in case you have an interest: https://purpledaisiesquilting.com/products/quilt-halo-free-motion-quilting-tool
Thanks so much for that info!
Pingback: A Colorious Quilt | Deep in the Heart of Textiles